

911rat
-
Posts
173 -
Joined
-
Last visited
Content Type
Profiles
Forums
Events
Posts posted by 911rat
-
-
Inspiring story. You'll bounce back before you know it.
-
I'd snap it up if I thought I'd ever want a Russian.
I doubt you'll ever find one that cheap again. I'm not positive, since I don't price them myself but I think they usually go for about $300 or so now.
I had a Russian years ago and dumped it. I wish I'd hung on to it. It was a good shooter. Seems like every collection needs an SKS. Or even better, one of each variation.
-
I've heard the Imperial Wax is the same as the wax electricians use to ease pulling romax through conduit. Can't think of name off hand. I can't say it with any first hand knowledge, something I heard in another group. Several posted in the thread claiming to use it. It is supposed to be available at Home Depot for a substantial amount less is cost.
I've annealed brass by hitting it with a propane torch untill it changes color then dip it in water to cool. Afterwards I'd let it bake in the Arizona sun to get any moisture out of the inside.
Thanks AZ
I'll check the Home Depot for that wax and give it a try. Also, thanks for sharing your annealing technique.
I think you might be talking about Gardner Bender Wire-Aid.
-
My wife and I cast our votes on the way to work. I can't beleive how many people I've talked to today didn't vote.
-
Well, according to my old NRA handloading book, it seems that the neck/shoulder should be annealed after die forming and before fireforming to extend case life. I've never annealed cases before.
Any tips? I thought of using Tempilaq from Brownells to make sure I don't over heat the necks.
AZ I've got a 223 case drilled and tapped just like that. I had some 308 brass get stuck in both a Redding and Lee sizing die last night. I used an ample amount of RCBS lube. I think the .308s were fired in a semi with a large chamber.
I know a lot of guys that swear by Imperial Wax for sizing. Midway carries it and I think it's marketed by Redding now.
-
Well, I did 100, No necks split, they are a bit shorter than 35 Whelen brass but I suspect it makes no difference. If nothing split I'm thinking anealing isn't necesary. I used plenty of lube inside the neck applied with a q-tip. (Reminder; Tell the wife we're out of q-tips again)
I actually tried running them over the expander in 8x57 dies first. They went through the Whelen dies easier than not running them through the 8mm but I felt it wasn't worth the extra step.
-
might try one of these...
http://www.dixiegunworks.com/product_info....oducts_id=11582
at least it would be entertaining...
LOL I saw that too! I almost bought one. Who wouldn't be a bit tempted to "modify" it a bit.
I had a problem with rats running through my back yard last winter and this spring. After growing tired of emptying traps I bought a bait station that looks like a rock. Not only did that end my large rodent sightings but I have'nt seen any signs of mice in the garage this year either.
I found traps for both rodents work best with peanut butter placed against a wall or other barrier like a fence.
-
I had a shortage of 35 Whelen cases and decided to form some out of once fired 30-06.
I ran them through a 35 Whelen die without setting the shoulder back and the ones I've tried fit snug in the chamber. I did it that way to minimize stretch in the head area when they're fired.
Should I have anealed them first? Any tips? I assume someone else does this too.
-
Washtenaw Sportman's Club out in Ypsi. There's a website but I can't remember it off the top of my head.
-
The club I belong to has been holding deer rifle sight in for the last 3 weekends or so now. This was the last weekend.
Members and non-members have to pay $5 per gun but we supply the tagets, assist with spotting and sight adjustments, and can help with scope mounting and bore sighting if needed.
I volunteered to help this last Fri and Sat. Friday was a bit slow but Saturday was pretty busy. I was a bit surprised to see almost as many young women (teenagers) as young men this year with there fathers and grandfathers.
Dang it! That was me, forgot to log in
-Pat
-
Here goes.
Which Stephen King novel and mini-series featured the song;
"Baby Can You Dig Your Man?"
-
These are Getty images taken at "Peace" Rallies in Dearborn, MI within the past week or so. For those unaware, the population there is about 30% Middle Eastern.


-
I use Point Blank Ballistic also. I can't seem to remember a download link though.
I attatched a scan of the form I made years ago. I keep my data sheets in a three ring binder seperated by tabs for each caliber.
[attachmentid=143]
-
Karl,
That's right on.
I'm horrible at math. I had trouble meeting my requirements to graduate because of it.
Finally, I had a professor who was an MIT graduate. He was obviously teaching well below his abilities.
He did exactly as you described and I earned an "A" in the class. He broke it down as a language step by step and it all made sense to me. I hadn't earned an "A" in math since grade school to that point.
-
Though there are many more knowledgable than I, my only project so far (more in the works) shoots under 1 inch at 100. The only thing done to it was lug lapping to about 70% contact on both lugs and it has an inexpensive ER Shaw barrel.
"Blueprinting" should make it more accurate but it's up to you if it's worth the money IMO.
The ones I'm working on now will have the lugs and bolt face lapped and receiver face trued. Should be good enough as big game rifles for my needs.
-
Once in a while one of these stories makes the news.
I've certainly taken my fair share of strange calls. Even had a woman call back to flirt with me once.
My partner (we're scheduled in teams) took a call from a man who spoke with a lisp who kept calling him sweety, He'll hear about that till he retires.
-
The only one I've had experience with is the Sheridan Blue Streak in 5mm. It'll take pigeons cleanly and I've seen it take a rabbit with a head shot. I don't no if they're as good as they used to be, the one I used was probably mid 70's vintage. I think Crossman or someone bought them out.
-
I'm using all military parts at this point to see how it works. I'm not sure if I'm trying the same original bolt assembly parts for this reveiver. I thought I was but never marked them. The forged bolt is not original, I discovered that the original had a bent body. Looks like the only thing to do is take a little off a cocking piece. I figure I only need to remove about .005 the way it looks. It's very close.
-
Sporter Express has complete K98 bent bolts for about 45.
Thanks for the info. That's a pretty good deal. One of the other members of the forum had one he could spare.
-
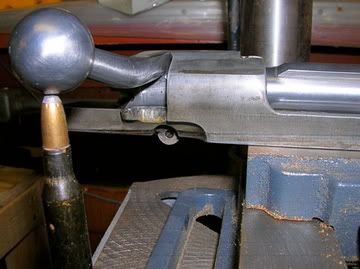
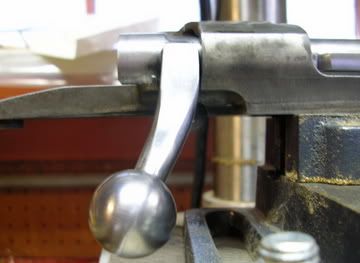
I was checking out one of the Mausers I just notched for a handle and found that the safety will not engage after it is taken off. The cocking piece just a tad too far forward for the safety to cam in. Using original military trigger/sear and safety.
The same parts work fine on another receiver/bolt combo. The only diference being the bolt body and receiver. The handles are both notched in properly, stop at exactly TDC and the bolt handles don't jump.
Figured someone else had the same problem. I couldn't find anything on a search. I'm guessing I could try different sears and cocking peices?
Oh, and how much does the Mauser "bolt slop" affect accuracy?
I know I'm gonna smack myself in the forehead with the palm of my hand when I get the answer. I'm getting flat spot now.
-
The advice for notching that I've followed is out of Roy Dunlap's Gunsmithing. His advice is to notch just far enough that the flag safety is easy to fully engage.
After reading up on what everyone else here said about it, I used two tests. I marked the inner "c" ring (hope I named it right) where the ejector slot indexed on a straight bolt. Then I kept cutting until the safety engaged. I found, on mine anyway, that the safety engages just before TDC. Taking off a little bit more (very little) the safety engages easily at TDC. And, if anyone's wondering, that's one of Davis' bolts. Top notch work.
-
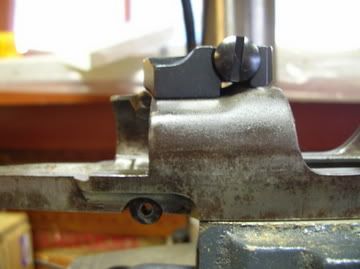
Best I could do for pics at this time. It works just as it should. The bolt closes at TDC and seats against the bolt lugs. Just a little bit of clearence fore and aft.
The receiver looks gray from the de-rusting process
I also Drilled and tapped my first receiver! I tried drilling for the Leupold 2 piece bases on a practice receiver that had a lot of setback. I drilled and tapped the rear hole first with a Wheeler jig, then I instaled the base and tightened it down and made sure it was square, I marked the front hole with a Brownells #6 center punch, used the base as a drill guide on my drill press, and then indexed the Wheeler jig so I could use the bushing to keep the tap straight. It fits perfectly.
-
No, it means when you cut the notch and close the bolt make sure you don't see the bolt moving forward. If you do, what is happening is that the bolt root is resting on the notch and the lugs aren't making contact. All your truing work is for naught in that case. You want enough clearance so the isn;t interfering with the lug operation.
Ahhh. In other words, the bolt should be inleted closly with the lugs making contact with the recesses and a small amount of clearence in the notch for the bolt handle.
Thanks Z
-
I understand the whole concept about not notching a bolt into a receiver too deep.
Z1R said in a previous post to make sure the bolt has "no forward movement."
Does this mean that I should cut a tight notch that makes it impossible for the bolt to move forward at all? Or just minimize any forward movement?
From what I've been able to tell, the firing pin spring holds the lugs against their recesses but I suppose when the gun is fired the bolt would jump forward a bit. I noticed that even straight unforged bolts move forward just a bit.
-06 In -07
in Finished Products & Misc.
Posted
Coming along great. Remember, there's no time limit. I've learned that sporters are best built sloooowly with a lot of attention to detail.