diggerdanh
-
Posts
86 -
Joined
-
Last visited
Content Type
Profiles
Forums
Events
Everything posted by diggerdanh
-
Got my package today. Thanks gents. I appreciate the work you've done to put this together. AzRedneck, I'll get an envelope back in the mail to you tomorrow for the postage. We should do this again in another month or so
-
Which Cheap Synthetic Stock Has/had Blind Magazine?
diggerdanh replied to diggerdanh's topic in Mausers
It's Choate. -
Gents, I pulled a cheap stock out of my parts basket a few days ago that I had picked up on Ebay a while back for really cheap. This one looks very similar construction-wise and style-wise to the Ramlines that I have, but it has a blind magazine, a little built-in trigger guard, and a bit of a "hump" in the belly of the stock (don't really know how else to describe it without pictures). Anyway, I really like this stock compared to the other cheap synthetics that I have used. once I stiffen up the forend a little bit I think it will make a nice, light sporter. But it doesn't have any kind of brand markings on it - it just says "98" in the barrel channel. I seem to recall talk about one of these stocks that had a blind magazine from several years ago but for the life of me I can't remember which one. I'd like to dig up a couple more if I could. Does anyone remember the maker of the inexpensive synthetic stocks (similar to Ramline, Corelite, Butler Creek, etc) that came with a blind magazine and built-in trigger guard? Thanks, Dan
-
Probably not exactly what you are looking for since you mentioned "veneer" but I thought I'd throw it out anyway since it is difficult to pass it up for the price. The best prices right now for a Mauser stock are the Butler Creek synthetic stocks at CDNN Investments for $39.99 ea. Currently they are offering $9.99 shipping for any order, but they had $5.99 shipping for any order two of the past four weekends. http://www.cdnninvestments.com/ma98laristac.html
-
Yup, that looks good, Rivitir. MO is in the mail. Thanks, Dan
-
Midway is showing the retail price for $89.99 for the MN trigger and once logged in it is $84.99 for C&R price. So it looks like it would be about $10 cheaper with the group buy than from Midway.
-
The laser work turned out really nice! I like the basket weave.
-
I'm in for one.
-
Those are looking pretty good. You've come a long way in a short time. Keep it up!
-
Congrats! He looks like a keeper
-
Thanks for the tip on the Adult Education classes. I had not considered it for the smallish stuff I want to do, but I think it will be a good learning experience. I was just looking into it and there are two local tech schools that offer a machine shop basics class and an advanced (gets into lathes, milling, etc) a couple nights a week for several weeks. They also have basic welding and advanced welding which I might take after the machine shop classes. My wife is currently in "going back to school" mode so I'll probably have to wait until she finishes up next fall. But I'm looking forward to it - should be fun.
-
I won't let my wife in on that part yet!
-
I know a mini won't be able to do everything and I realize that I'll eventually want bigger and better, but I'd rather start small. I've read here and other places where some guys really do a lot with their mini lathes and recommend them for beginners. Milsurpcollector, you're right - there are always several big lathes listed on Craiglist around here. The problem is that I have no idea what to look for in buying a used lathe, no idea how to use it and nowhere to put it if I did get one. I figure that if I start with a small(ish), cheap(ish) one I can learn the basics with it (or figure out that I'm just not cut out for it before spending too much ) and learn its deficiencies and shortcomings and what I would need to look for in the next one I buy when I'm ready to step up. I've read some recommendations here and there about which small lathes to buy and recommended sizes, but I don't want to pick one up, unbox it in the garage and stand there looking at it dumbfounded, not knowing what to do next. Headstock, tailstock, live centers - it's all greek to me I think if I can check out someone's setup, get a quick primer on the parts and pieces, and watch them do something relatively "simple" then I'll be in a much better position to pick one out for myself and get started.
-
I added to another post in the For Sale forum where I stated I now realize that I'm going to need to invest in a mini-lathe if I want to take this hobby to the next level. I've stuck to surplus barrels thus far and been lucky as far as headspace and such goes. But to get better and have more options available to me I need to be able to set a barrel back, thread barrels (for converting to small ring for K-Kales), face receivers, etc. I definitely don't have the room or skill for a big lathe, but I'd like to start small with a mini-lathe that will do what I need. I have no machining skills, other than hand-tools, drill presses, sandblaster, etc. I'm a programmer by trade, but I'm a quick study and learn from my mistakes . I know there are several members of the board who use a mini-lathe. While I could probably eventually figure everything out from reading online, I'm more of a visual learner. Ideally, I'd like to find someone close by with a good setup that I could take a look at who wouldn't mind spending a couple of hours showing me the ropes. Explain how it works, what I should look for and maybe even watch them do something like thread a barrel, face a receiver, or something similar. "Close by" is a relative term - anything within a couple of hours (I'm in SW Ohio) would be fine. I know there is a good group of guys from here in Western PA - that would be fine by me.
-
Looks pretty good. Can't wait until you're in full production mode!
-
It's okay. I don't quite like it yet, but that's just because I don't like change . I'm sure it will grow on me.
-
Riv, I can't speak about professional restoration, but it sounds to me like you just want to restore them enough to look respectable and protect them from any further damage. I can help with that. I have no idea on the disasembly guides, hopefully someone else can chime in. After disasembly, the first thing you'll want to do is thoroughly clean off all the dirt, grease and grime built up over the years from all the metal parts. Simple Green, or any other cleaner/degreaser you have on had should suffice. Wipe off excess dirt and grime with rags and then use and old tooth brush to get into the cracks and crevices. You can use a small hand-held wire brush to take down any heavy rust - but use a gentle hand. Now you should be able to better see what you've got to work with. Naval Jelly will remove the blueing, rust, etc. and leave nothing but the pitting. Again, a small wire brush with light pressure will help in the rusty/pitted areas. I don't know that I'd remove all the bluing - it may be okay in some/most areas. But for larger visible areas like the top of the barrel and receiver you may want to remove it all so that your new blue will have an even color. After getting all the rust removed and everything cleaned up you'll want to use a degreaser on everything, I usually use brake cleaner. Depending on how much pitting you have and where it is located you may or may not want to fill in those areas with epoxy. It's really your preference and also depends on how you plan to finish. I've had good luck with Duracoat spray finishes and it will easily cover over any pitted areas that have been filled and you won't even know they were there. But you may opt for a more traditional blued finish for these two firearms. If you end up with just a couple of spots that you need to reblue then you can try a cold blue like Brownell's Oxpho-Blue. It might or might not look good enough for your purposes. If you want to go all out then you could rust blue everything yourself. There are some good tutorials on this site and other places on the internet explaining how to do it. If it will be some time between taking it down to bare metal and when you finish it then you'll want to apply a light coat of oil to everything so it doesn't rust in the meantime. You'll just have to remember to degrease it again before finishing. Additionally, you'll want to do the cleaning/degreasing or any work with chemicals (like degreaser and the cold blue) outside rather than at your kitchen table. The cleaning/degreasing will be messy and you don't want to be in a confined space while working with any chemicals.
-
Best of luck to you! I know you'll take the limit and have plenty of pictures to share.
-
Thanks, guys (Clemson said it was a nice looking rifle on another thread). The pictures make it look better that it is, but like I said I'm pleased and I'm not the kind of guy who can't take a compliment . I consider it an honor and am extremely proud to have guys like you "nod and approve". I consider everyone here to be my peers, mentors, and heroes. I've been a member and avid reader of this board and its predecessor for a long, long time. It's been great watching everyone's builds get better and better as time has passed. I see lots of guys write posts saying "Thanks guys, I couldn't have done it without this board and your help". Now it's my turn. I don't want to get too sappy, but truly I never in a million years thought I could have built my own custom rifle with just a few hand tools, some custom tooling, a drill press and a small air compressor (for sandblasting mostly). I'm amazed at what a guy like myself can do with a small budget and good instruction. It it wasn't for all your answers, tutorials (on things like how to file and stone a receiver, how to bed a stock, how to finish a stock, how to break loose a really tight barrel, etc), and inspiration in the form of pictures of your own guns I would have never had the balls to take up a hobby like this or keep pressing on when things seem too difficult. The shared experiences increases the collective skill. It's amazing how I can remember how to do something like I'd done it myself in the past though I had only read about it here on this site. Your wisdom, patience, and friendliness is beyond reproach and much appreciated. Thanks again.
-
Thanks gun nutty and Clemson. That's what I intend to do. I'll take her to the range and see how she does and keep an eye open for signs of high pressure.
-
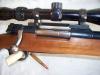
Thanks, gun nutty. It really is a beautiful piece of wood. Funny you mentioned about the front half having very uniform grain. I had not thought about it too much but the area forward of the wrist almost looks like completely different piece of wood than the buttstock area. The buttstock area has tons of figure and I didn't get a great picture of it but the buttstock has a lot of nice tiger striping, too. The profile is great, very light and easy to handle. I haven't weighed her yet, I'll have to do that. I wanted to mention that the second pic makes the duracoat look an electric blue color - it is definitely not that blue. Must just be a lighting trick. It's a dark, dark blue. Some of the pictures make it look black and it's not that dark, but it's definitely darker than the color in that second pic.
-
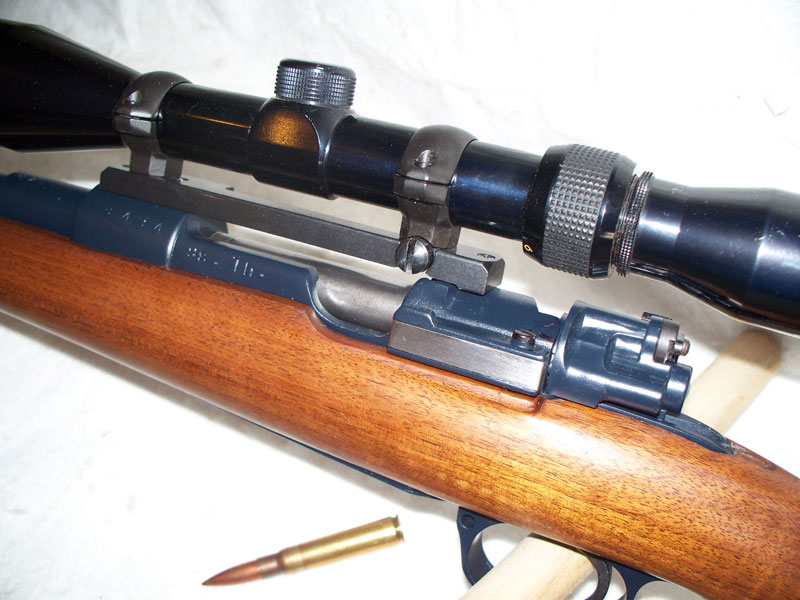
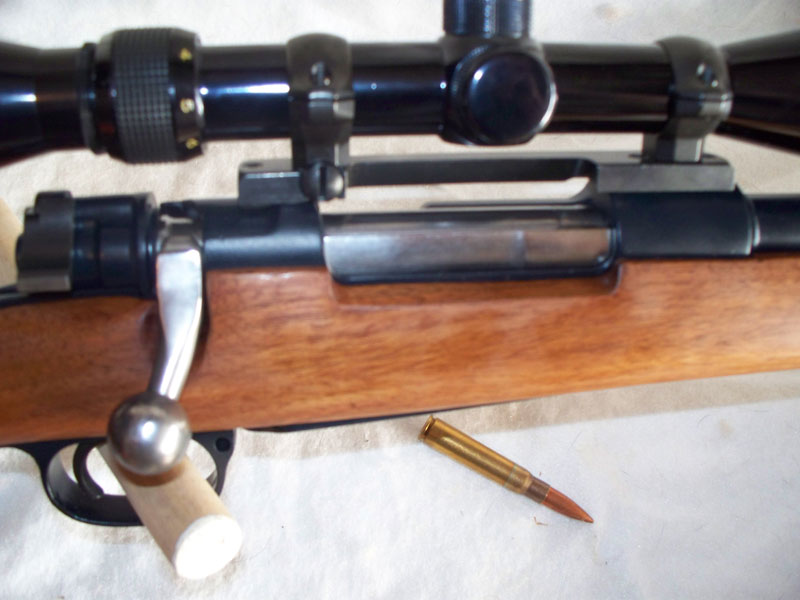
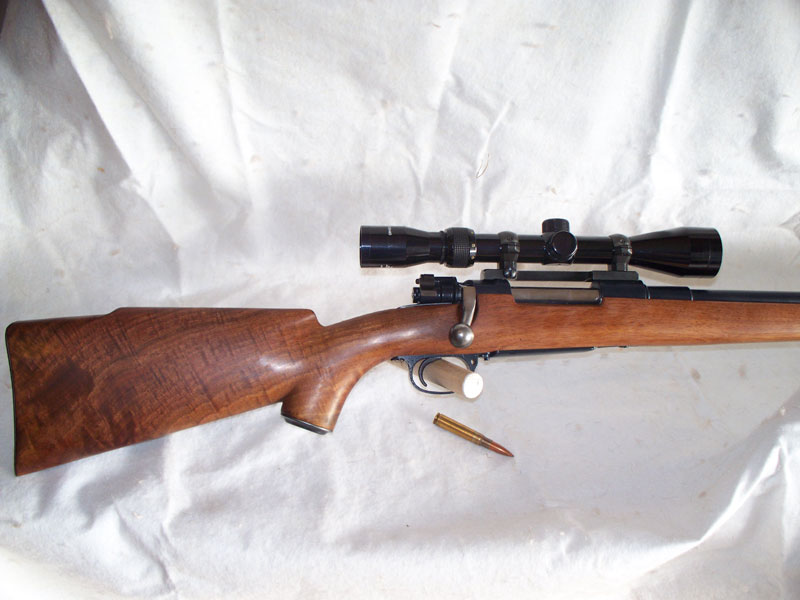
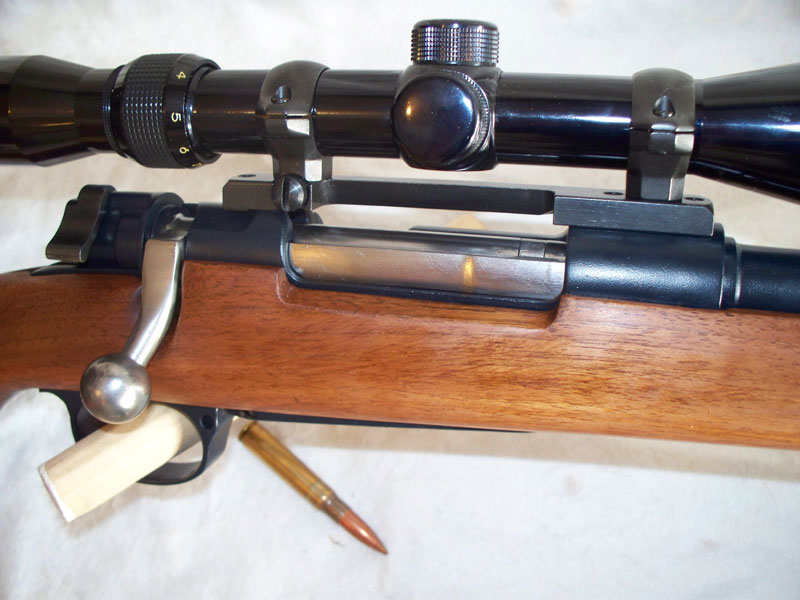
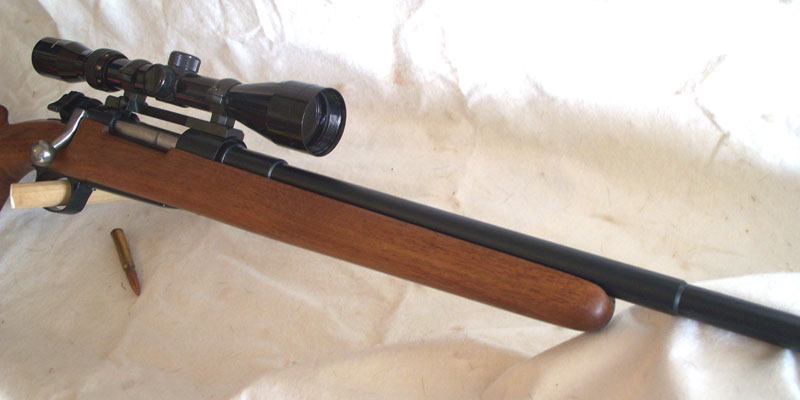
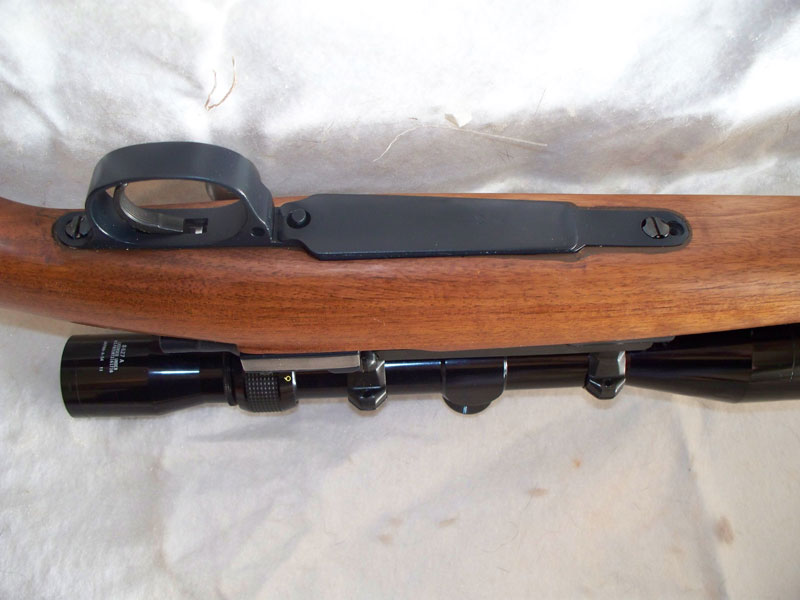
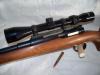
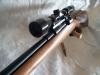
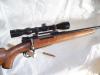
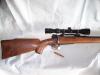
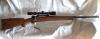
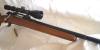
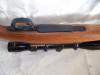
Gents, for your amusement are pics and description of my second custom Mauser project. My first build was nothing more than adding some parts and a Swede barrel to an 1894 Brazilian receiver and dropping it in a stock. This one was much more involved including lots of metal prep. To keep it fairly simple the inspiration for the build was classic 50's/60's sporter look. This rifle started out as a Gew 98 and was reworked by the Turks in 1954. It is marked "ATF 1954" on the ring and "98. Th." on the left side rail. I got it from AIM Surplus several years ago when they were selling fair/good Turk mausers for $39.99 each. It is a large ring receiver and has a large ring barrel. It did have the handguard lip cut in the receiver like other Turk reworks. The barrel was in good shape so I just took off the sights, cut it down to 24", and recrowned it. The receiver was in good shape, but a little rough so it required quite a bit of filing and stoning to clean it up. The stock is used stock I bought from Ebay cheap. The seller said it was for a small ring so I thought I'd stash it away for a couple of 7x57 Chileno projects. When I got it I realized it was a large ring stock but it was very slim. I figured it would go well with this project. It is nice and slim and I like the look, but it was so slim that the trigger guard is a little proud at the rear of the magazine box and I had to slim down the tang quite a bit to get it to sit fairly flush. The stock finish is nice, but I haven't spent a ton of work on it. I just cleaned it up a bit, applied a little stain and a couple of coats of tung oil. It looks good enough for a hunting rifle, though I'll probably add a couple more coats of tung oil over time. Parts include Timney Buehler style safety, Timney trigger, Wolf springs, Brownell's extended floorplate release, Redfield 1-pc base, and Millet rings. Pretty standard stuff. I bought the forged bolt off one of the auction sites. It's topped with an early 70's Japan-made 3-9x40 Tasco scope that looks brand new and looks to have been never mounted on anything until now. The finish is Duracoat "gun blue". I really liked the entire duracoat experience. Finish looks great and it was a piece of cake to spray. From start to finish it only took about 3 hours to apply and that's counting time for sandblasting, other prep and cleanup. The "gun blue" looks fine on this rifle but I'd probably stick to black or flat black for the next couple of projects I have planned. All external parts except for the extractor spring and the safety were sprayed with Duracoat. The safety had a decent blue finish and I decided to leave it like that. The extractor spring and the bolt are polished. I may jewel both once I get all the parts and pieces for bolt jeweling ordered. I did all the work myself except for forging the bolt, which really just means that I pulled the barrel, D&T'd for the scope, and did a lot of filing, stoning, sanding, etc. Things I don't like about it: it doesn't close on an 8x57 go gage (discussed in another thread) so I'll probably clean up the chamber with a reamer before I shoot it. From now on I will always measure headspace on a mauser rifle before I start tearing it apart if I plan on using the original barrel for the build. As mentioned above, the stock is a little too slim and the fit in the magazine area and tang were not great. I probably could have cut down the top of the trigger guard a bit to get a better fit but I was hesitant to screw it up just so it would look better in a $40 stock. The barrel rides a little high, too. The stock was cut for and originally had a sporter barrel in it so there are some big gaps in some places with the military barrel. The stock also had a lot of bedding already in place for its previous action so I had to cut that out and do a lot of bedding myself to fit mine. Looking back I probably would have been better off spending another $50-60 on a Boyds or Richards stock and saved myself a lot of time and it probably would have ended up with a better end result. For the most part, other than the minor gripes mentioned above, I am pleased with the end result, especially for my second build. And it's definitely a budget build - even though I replaced safety, trigger, springs, etc. I have less than $250 total in her including mount, rings, and scope. I think it looks like a classic sporter. I'll like it a lot better if it's a shooter. Okay, enough babbling. Here's the pics:


-
I'm not a reloader (yet!), in fact I don't even shoot any of them all that much except for my Rem 870 Express during deer season and a couple of .22 rifles whenever I get to the indoor range a couple of times a year. I'd like to shoot more but I just don't yet. I just like building them. As Clemson suggested, I tried to close the bolt (removed the shroud/firing pin just in case, but left the extractor on) on a live round. The bolt closed and locked fine. So I'm thinking that the chamber is probably on the tight side and uses the older style 20 degree 48 minutes shoulder and that newer-style 8x57 Forster head space gauge that I have, that has a 19 degree shoulder, is not measuring the chamber correctly. I think to play it safe (and because it will probably end up in the possession of one of my sons eventually) I will hold off on firing it until I get a chance to use a reamer on it to clean up the chamber to be certain. Thanks for all your help guys. Build is finished - I just finished mounting scope an hour or so ago and doing some other minor clean up. I'll post some pics and details a little later.
-
Having to bed the trigger guard and tang area to fill any gaps seems like standard fare for any type of drop in wood stock. I haven't fitted a Boyds, Richards or Fajen yet, but I have fitted a couple of used stocks to new rifle builds and I ran into the same issues. Yes, use the brown dye with the Acraglass kit. If you're not going to stain your stock and it is a light color then there will be a little bit of color difference between the acraglass beddding and the stock itself. Acraglass tends to look translucent if you don't use enough dye and IMHO it would be better for the acraglass to be a little darker than to be translucent. Unless you have really big gaps, which I doubt you will, you won't really notice it - it kind of just looks like a shadow to me. And even if it is a little noticeable then I still think it's okay because it just kind of comes with the territory of a drop in stock. If you wanted a perfect fit all the way around then you'd have to opt for a custom stock or 90% inletted stock (and the money/time that comes with those). Many are okay with the tradeoff, especially for a hunting rifle. Even if you don't want to stain the rifle darker you might want to consider going with a "natural" stain - it will help bring out the figure in the wood. I just finished adding a couple of coats of natural stain to a nicely colored maple stock and it really made the figure and tiger striping pop. For filling the gaps around the trigger guard and tang I like to use acraglas and one of those little syringes that you give little kids medicine with. I don't know if they're actually called syringes, but they look just like a syringe without a needle. With little kids we've always got a couple laying around the house but I've used the same one for about 4 years now. I'm sure you can pick them up at the drug store pretty cheap. Once I have the Acraglas mixed in a cup I just slowly pull some into the syringe trying not to get any air bubbles. Then I just release it into the voids to fill a drop at a time until the area is filled. I usually have to make a couple passes over a period of a couple of days to get it "perfect". Just make sure you use plenty of release agent on the metal parts, plenty of clay or whatever to dam up any areas you don't want the acraglas to flow, and I like to use painter's tape on the stock. Easy to do, just takes patience and time.
-
Aye, I've done plenty of book-learnin' on the Turks. I have 2 K.Kale rifles and this 1954 Turk ATF marked rifle - a Gew. 98 refurb. I forget what the correct number is but I've read that there were only like 10-15,000 1954-1956 ATF marked refurbs. That makes this an interesting piece of history. Too bad mine was really beat up and none of the numbers matched. Now I can't state how the rest of the rifles were done - this one does have the hand guard lip cut of course, but the barrel was not shortened in the thread area - it was left as-is. A couple of threads are visible in the area where the recess was made. Thanks for throwing that in Spiris. It'll help provide a complete picture for those reading this thread later on down the road, like me in a couple of years when I can't remember why the bolt in this rifle won't close on a GO gage.