

Mauser98
-
Posts
11 -
Joined
-
Last visited
Content Type
Profiles
Forums
Events
Posts posted by Mauser98
-
-
Funny you should mention the 'Golden Ratio". Just today I received my Lee Valley catalog and found this clever device.
http://www.leevalley.com/wood/page.aspx?c=...amp;cat=1,43513
I have used the Golden Ratio to determine forend length on a couple of stocks I've done and I like the look.
-
Hello, well its been awhile but I'm finally picking up my project again, a new house, with tons of work put things on the back burner for me
My question, What angle do you guys usually mount the recoil pad in relationship to the barrel?? I don't have any factory stocks to measure?
I started with 90 degrees using a square, I figured this a safe bet but for some reason it looks a bit weird
For reference, its a richards montocarlo stock and a mark X (it took 22 weeks to get it by the way!!) but it looks alright, I think they always grade it a bit higher than what you get but my opinion
thanks for any feedback!!!
I use a down pitch of about 2.5 inches. This works out to about 4 degrees. In other words the angle of the pad to the bore is about 86 degrees.
-
Very nice, Z.
How do you attach your forend tips? Specifically, 1) how do you square the end of the stock and the tip; 2) do you make the tip oversize and shape after attaching? 3) how do you attach (dowell?) if you use a dowel, how are you drilling both the tip and stock at 90* (I can handle the tip, but the stock is giving me fits)?
I'm right about ready to try to attach the ebony tip to my 30-06 stock and I just don't know how I'm going to do these things. If I don't get some advice I'm afraid I'll take my usual bubba approach and just do the way that occurs to me while I have the parts in hand. The damn stock is nice enough and the ebony was expensive enough that its slowing the bubba in me down.
I'm not z1r but......
1. I use a 10" chop saw to cut the stock. If the stock is already shaped, it takes some careful measuring and eyeballing to get everything square. If I'm making a stock from a blank, I prefer to attach the tip material while the blank is still square. I also use the chop say to cut my ebony. I have a 6" X 6" block so I'm able to cut safely.
2. I make the tip oversize and shape after attaching but I try to mount the tip so that it's top is very close to being even with the top of the stock.
3.I attach using two 1/4" dowels set about 3/4" apart. I mount the stock in a padded vice with the top of the stock level. I use an electric drill with a leveling bubble in it and eyeball the side-to-side alignment. Psst-and now the big secret- I use a 5/16" bit to drill all the holes. This allows the dowels to move around a bit in the holes and reduces the need for perfect hole alignment. I use Acra-glas gel dyed black to bond the stock and tip. Use enough gel on the dowels to fill the oversize hole. A bike tire inner tube is used as a clamp.
-
I built a whelen and would like to lengthen the mag a little. Right now its about 3.31 and I would like to know how much longer I ca get and how to go about . Do I file and clean it up.
Thanks
On my Whelen I filed both ends of the mag well to about 1/2 their original thickness. It gave me plenty of length.
-
I recently finished my second rust bluing job so I am far from been an expert. I did, however, learn a lot of does and don'ts.
To protect the interior of the barrel I applied a coating of lacquer that I got from a hobby store. I degreased the barrel then ran a lacquer-soaked patch through the bore. After the job was complete, I ran a toluol-soaked brush/patch through the chamber/bore. It worked fine.
I blued everything except small pins and springs. I even did the rings, bases and screw heads.
I blued the entire bolt including the lugs.
The best purchase I made was the carding wheel from Brownells. I used degreased steel wool on the first job and the wheel(degreased) on the second. No comparison-the wheel was much easier and quicker and it got into corners better.
My damp-box is a large cardboard box with a slow-cooker full of water and turned to high. I'll be building a proper box soon but the cardboard box worked great. Humidity was 60-70% and temperature was 90-110 F.
My boiling tray on the first was a length of rain gutter with the ends sealed with high temp silicon. Boiling wqs done on the stove top in my camper. For my second effort, I had a friend cut one side out of a piece of 3" square tubing and weld up the ends. I used our electric kitchen range with the tray kitty-corner over the large elements.
Pay attention to degreasing and wear rubber gloves at all times. If in doubt, change gloves and wipe down the parts with acetone between applications.
I am soooooo happy with this method of bluing. I have got 3-4 other rifles to do and it nice to know I won't have to pay someone else to do the work.
-
Well, I may have answered most of my questions, I just found the post by reverend recoil in the tips of the trade.
I guess the couplr things not answerwed are plugging the bore and chamber, I guess what is used and also how much of the chamber do you plug, just the actual chamber or do we want to protect the lugs as well.
thanks again
I just finished rust bluing two rifles - my first.
To treat the barrel, I coated the chamber and rifling with lacquer that I bought at a hobby shop. Before using it and as a test, I put some on a piece of metal. After drying I applied some toluol which dissolved the lacquer quite nicely.
To coat the barrel, I soaked a patch with lacquer and swabbed the barrel.
After completing the bluing, I cleaned the barrel with toluol then oiled. The barrel is fine.
Living on the wet coast of Canada, I figured I'd be ok without a damp box. Unfortunately, we had some nice weather and the RH in my shop dropped to 25-30%. I set a large cardboard box over a crock pot full of water and hung my barreled action inside. The lid was a piece of cardboard. The temp in the box was about 100 degrees F and the RH was 55-65%.
-
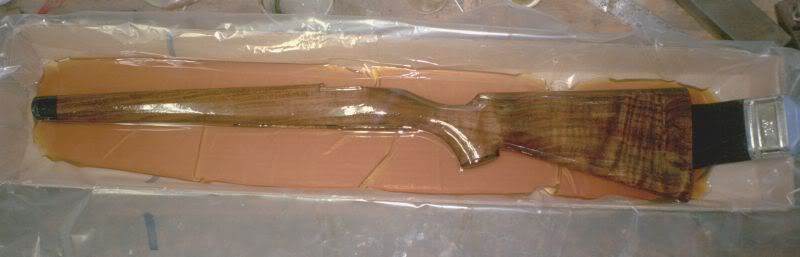
After all the sanding, grain raising, etc, I seal the stock by soaking it in a mixture of Interlux Original Marine Spar Varnish, Deft Marine Teak Oil and paint thinner(1/3 each) for 10-12 hours.
I let dry for 30 days or so.
I then fill the stock by wet sanding with the mixture and 320 paper. I don't wipe the mud off. Let dry for at least a week. I then wet sand with 320 again but this time I wipe lightly with paper towel. I repeat this step with 400 wet and 600 wet, letting dry for a week between sandings.
Usually I will wet sand with 600 a couple of times. After the last time, I will scrub the stock with paper towel while it's still wet.
I'm done and the stock is waterproof.
Here's a picture of a stock soaking - literally.
-
Hi all,
I'm just finishing up two 325 WSMs that I built on FNs (one for me and one for my son). Not only am I the first kid on the block to have one I may be the last, considering how they are not exactly taking off like crazy.
Anyway, I have solved all of the problems that come with putting a WSM in a Mauser (and, boy, are there a bunch) except for ejection. With a loaded cartridge it ejects cleanly. With an empty case (which is what you usually do when hunting) the empty just wiggles a little bit when it hits the ejector and then lays there like a big egg.
Changing extractors made no impact. Right now I'm planning on adding metal to the end of the ejector to see if adding more ejection leverage will kick that tubby little sucker out.
That worked on another conversion I did some years ago on a less strangely shaped cartridge.
Anyone else dealt with this before?
Brad

Make sure your ejector isn't binding.
I had problems with ejection with my .35 Whelen in a FN action. After much fooling around, I discovered that my ejector was binding in the bolt lug slot when the guard screws were tight. When I loosened off the screws, the ejector freed up and ejection was good.
It turned out that the bolt stop screw was misaligned with it's hole in the stock, causing the screw to torque to one side when the guard screws were tight. The torquing caused the ejector to bind. I redrilled the hole and my ejection problem was solved.
-
I'm sure that this has question has been asked here before, but what are some opinions of this action?
Anybody know who actually makes them besides "Europe"?
These actions are made in China and exported to various firms including Doumalin(sp).
A friend of mine is the Canadian importer(Lever Arms, Vancouver, BC 1-604-736-0004)
I have handled the actions and rifles built on them and found them to be quite nicely done.
-
I'm no expert but I do know what I like and I think you're on the right track.
Just a couple of suggestions.
1. Try to straighten the bottom line of the butt from the toe to the bottom of the grip.
2. As mentioned, perhaps take a bit more wood off either side of the rear tang so the sides of the stock blend in with the sides of the grip.
3. Try to blend the front face of the comb with the top line of the grip. You've got a pretty abrupt angle there. Perhaps the top of the grip could be cut down a bit and the front face of the comb allowed to merge with the grip as a radius. Try not to move the point of the comb back any further.
4. Try to minimize the hollowing behind the grip on the sides. The side of the stock should be form a straight line from the butt to the sides of the grips along the side mid-line.
5. A couple of flutes on each side of the comb might look good.
Here's a cpuple of samples that show the treatment around the comb and grip.
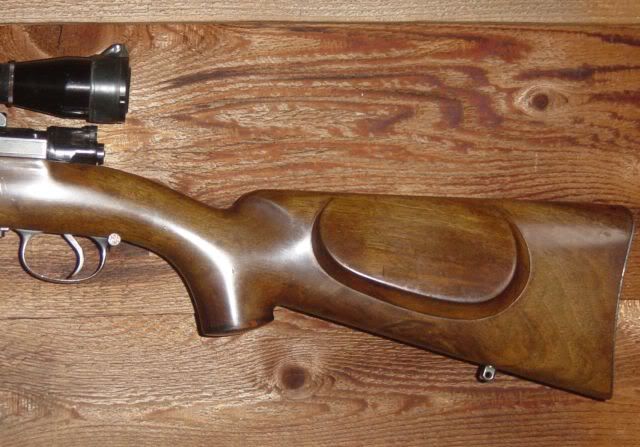

There are some stockmakers who claim that a stock should be a combination of straight lines and portions of circles.
One of the best friends a stockmaker can have is a good steel 18" straight-edge.
Opening-up Rails
in Machine Work
Posted
I recently had a JC Higgins M50(FN 98) converted to .375 Ruger. Besides opening the rails, the gunsmith opened up the rail lips, thinned the top sides of the magazine box, reconfigured the rear half of the sloping portion of the follower and polished the the feed ramp. Actually, he may have reconfigured the ramp - not sure.
I also had him adapt the extractor so that it will snap over a push-fed round. In order to do this I have to squeeze the rear portion of the extractor as I'm turning down the bolt handle.
The rifle has a capacity of 3+1 and feeds those big, fat rounds perfectly.
The only fly in the ointment is when I eject the last case, it hits the upper corner of the right lug race in the receiver bridge. This causes the case to eject very weakly or to sometimes fall back onto the follower. All other cases eject as they should. This problem will be address before hunting season.
Sorry, I can't resist showing a picture - original stock(with mods) and all.