

Pedestal
-
Posts
35 -
Joined
-
Last visited
Content Type
Profiles
Forums
Events
Posts posted by Pedestal
-
-
Don't fool with any equipment other than Victor or Smith, with Victor preferred. The cheap stuff on Ebay, etc. is not worth fooling with. Expect to pay about $250 for small tanks (ox/atc), and about $250 for a beginning Victor kit (new). Of course, used prices can beat that by a considerable amount, if you get lucky. If you decide on a MIG, do NOT expect to use one of the gasless, flux core wire for gun work. (They are not bad for general repair work, though.)
-
I start with 60 grit sandpaper wrapped around a short piece of wooden dowel, as close to size of the curve as I can get. Work down from there...
-
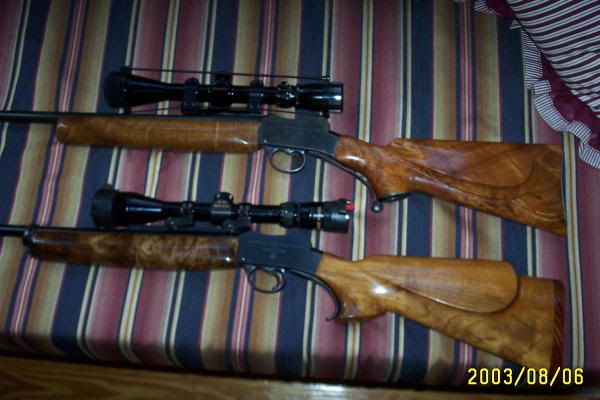
Here's a pic for you: The top one is in .357Max, the bottom is .17 Ackley Bee. Took a deer a year or so ago with the Max. (one shot, about 125yds) I really like the little rifle, perfectly adequate on our smaller Texas deer, and very handy.
I still have the .357Max reamer I could make a deal with you for, or if you know how, (I don't) I could send it to the reamer loan thingy they have going here.
I have a large Martini action, it may wind up being a .50-90 (or some BP round). I would like to have one of the .303 actions-I really have the urge for a 7x57Martini!...
-
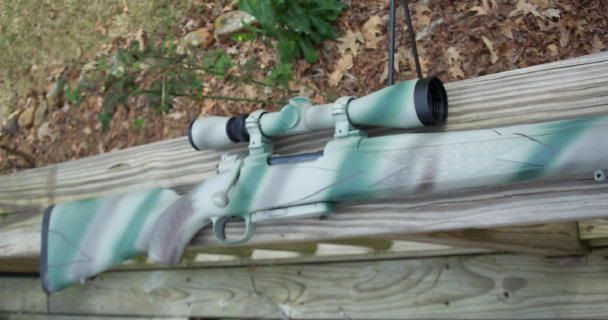
Here is a couple of pics that I used the Lauer stuff on. I like it. It appears to be very tough, is moderately easy to appy. I went exactly by the instructions, but did not use all the pre-cut "camo tape" that came with the kit in top picture. Bottom was done mostly out of leftovers.
-
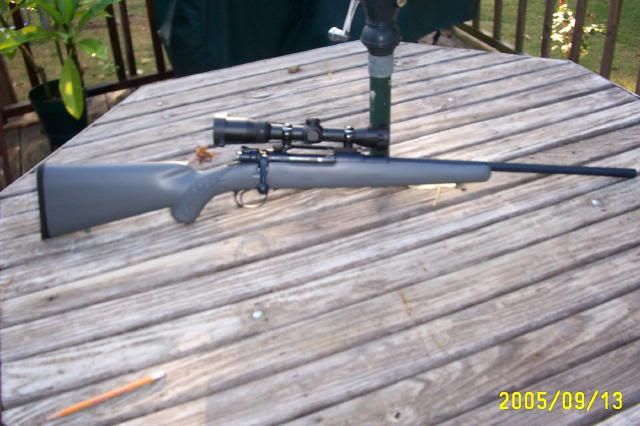
It's a much modified Ramline, I picked up used a couple of years ago. First, I chopped about 2" out of the forearm. The inside of the forearm was filled some with styrofoam strips, an aluminum rod was set in, and the whole barrel channel then glassed with Acragel. An aluminum pillar was made for the rear action screw. The barrel was free floated after the first short step. The butt was filled with expanding foam, and wood blocks were glassed in to recieve the buttpad screws. The orginal buttpad was trash, it was replaced with a 1/2" Pachmeyer. After reshaping the forearm and sanding the whole thing down, it was painted with Lauer Weapons Epoxy paint. The original color was white, so I dyed it a gray with some Acuraglas dye. (It looks like it has a blue tint in the picture but it doesn't) Metalwork was painted with Lauer Weapons Epoxy "Gun Blue" after blasting.
-
-
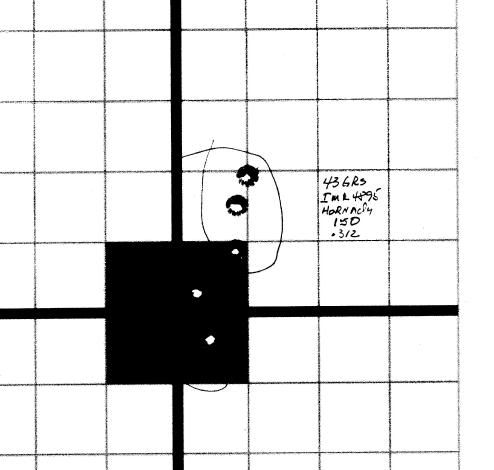
Here's a pic of Frankenstein, loads are 43grs of IMR 4895 behind the Hornady 150gr.
And here's a typical target...
-
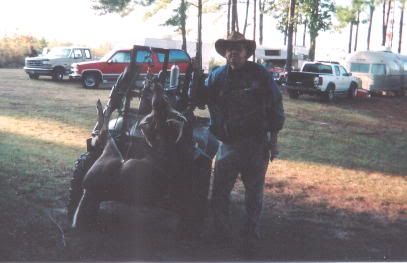
This is a very poor pic of the "basketrack" 8pt I took opening day with "Frankenstien". Load was my own handload. I did order a box of the Hornady 7.65, but it shot groups almost twice as large as my handloads. This was a fun and -relatively- cheap project. The little rifle handles quite well.
Range was only about 50 yards, and the bullet went all the way through. Entrance just behind the front shoulder, exit through the offside shoulder, ranging down a bit.
-
I think blasting is an absolute necessity for a good job. You can get by with a much finer grit than they recommend (and I prefer 320) but you still have to blast...
-
I have used it on several guns, with fairly good results. As with all paints, prep is the key. I have only used the black. I would strongly recommend you NOT use the spray can version. That's what I used, and like any spray can, it's difficult to get a good, even job. Not impossible, but difficult. Invest in a $20 airbrush.
I have recently started using Lauer Weapons paints, and like them a LOT. They are tougher than Gunkote (and should be, they are 2 part epoxy, not bake on). Downside is they are a bit more expensive.
Back to the Gunkote. On the first one I did, I masked off the rails, basically all the internal surfaces. On another one, I did NOT (other than the chamber area), and so far, it has held up to the bolt riding on it. But it has not seen a lot of use, either. In no case did I do the bolt.
-
I've posted these before, but....
The top one is in .357 Maximum, the bottom one is in .17 Ackely Bee. Nice little fun guns. I've got a large frame in the works, probably will be a .50-90 BP. Will be a while before that one is done...
-
-
I'm in the final stages of apprenticeship project #1, but already accumulating parts for my next try. My lessons in trying to make do without a checkering cradle have lead me to seek out stockmaking screws for my next inletting job. I have seen two types, and was wondering if I need both to do a proper job.
Type 1. "Inletting guide screws". These are the headless ones that screw into the receiver allowing it to slide into the stock and triggerguard holes from the top which gives you quick and easy alignment for 'in and out' test fitting.
Type 2. "Stockmakers screws". These are the T-handled ones that go into the receiver from the bottom and allow for quick tightening without tools.
Is type 1 typically used early on, then switched to type 2 for cinching things down and final fitting? Anybody have preferences or techniques as to when it is most benificial to use each type? Should I get both, or can I get by with one or the other? (I can "get by" with neither, but would prefer to do it right this time...)
Just wondering what others do.
As Zlr indicated, you really need both to do an inletting job. You can make them yourself, with a modicum of work. The guide screws are quite easy to make with a die nut. If you work on Mauser actions a lot, a die nut and tap for the action threads are handy things to have around the shop. For a one shot deal, though, I'd just buy them.
-
I was at the hardware store yesterday looking for something else and noticed that they had a file for chasing boogered threads on screws. It was a neat four sided file, divided in half so that there were a total of eight file surfaces for different pitch threads.
Anyhow, I got to wondering whether or not such a file would work for checkering metal. I'd like to try checkering a bolt handle knob or bolt release. Has anybody ever tried one of these, or are they too rough for decent results? The price was a lot better than a metal checkering file from Brownells.
I know that some people have gotten decent results from using needle files, but the small stuff I've tried with them looks like garbage. Maybe it's just the cheap files I have...
Thread files work just fine for laying out the lines-I have used one for that. You have to finish with triangular files, same as with a "real" checkering file. The only problem with the thread file is it's normally too coarse to make good looking checkering. Typically, metal checkering is much finer than wood checkering, usually 30lpi to 45lpi.
-
Yeah it is pretty bad, I don't want to have to worry about it,I guess its my first "Trophy" I like Doble Troubles way of looking at it. And I would'nt want my fiance to have a bad experience because of me not being responsible, it took six months when we first met to get her to go to the range and fire a gun (liberal parents). Thanks for all the advice I'm getting another one this weekend (the convincing won't be hard this kept me out of her hair for a few weekends) so I'll probably Be asking for more advice, NOW THIS IS A MISSION.
By the way she actually loves my old Ruger mk1, her NRA membership is next.
From what I can see in the pictures, I'd say it's toast. However-you now have an excellent practice piece. Want to build yourself a double square bridge? Weld away, see how it looks. Want to try building a kurtz action? Cut/weld away. A junk action can be a handy thing to have around to try different things out before you do the "real" one....
-
I'm going to go with the others here-start over. A good gunsmith could rethread the action, and thread a barrel blank to fit, however, that kind of work is not cheap. If the threads can be "cleaned up" with a tap, that might be another matter. However, if the threads are partially ground away-which it sounds like you are talking about-even with a "low pressure" cartridge you could be creating a potential bomb.
And, it's not like you have lost everything. You must still have the bolt and bottom metal. Maybe someday you'll have the chance to pick up a stripped action, or perhaps sell them to recoup some of your loss.
The first rule of this kind of work-DON'T TAKE CHANCES!
-
Norma loads the 7.65x53 to 52,000 psi. The .308 is loaded to 62,000 psi. The published velocites in a 24" bbl are almost equal to the .308's. If loaded to equal prssures the 7.65x53 would best the .308 just like the .30-06 does.
I sprung for a box of Hornady, just to see how it would shoot in my project. It's headstamped Frontier, and I assume loaded by Norma. I'll report back when I've had a chance to shoot it. (Which, thanks to Rita, may be a while..
 )
) -
You might also try using and electric soldering gun on the screws for a few seconds to loosen the Locktite...
-
Yeah, the mesquite is pretty heavy. Of course with the rig above it doesn't weight much.
The Argy bbl was a takeoff from one of the "Engineer Carbines", that I used the action for another project. Actually, I didn't think it would shoot well, until I spent a couple of days cleaning the bbl. There really was rifling under all the crud...

-
-
Yeah, it was mesquite: here's a shot of it. Another fun project with lots of aesthetics..

-
-
Here's a couple of pics of the Argy barrel on a Turk action that I had questions about in a previous post. The headspace worked out perfectly, although the barrel did not "time". That wasn't a big problem since I painted the rig, instead of blueing.
The metal work was fairly straightfoward. I didn't get the bolt down far enough (cut/heat/bend/migged), so had to grind a scallop to clear the scope. No biggy. After testing, I added a Bold trigger. The metal was painted with Duracoat "Gunblue"
The stock required a bit of work. It looked rather odd, with the short barrel, so I chopped a couple of inches out of the forearm. That of course got into the moulded in checkering, so that had to be filled in. I bedded the entire action and the first couple of inches of the barrel. I did not fill in the forearm, something I may do later-I don't care for that "flimsy" feel. It was painted also with Duracoat, some "Snow Grey", which is actually white. I added a tube of black Brownells Acuraglas dye to get the grey color.

Here's a couple of groups shot in the orginal testing...

-
Thanks very much for the offer. I had wondered about the pilot bushing business, if going the 06 route. I'm assuming the "normal" bushing would be on the order of .300", I -think- I'd need one on the order of .308". I have not taken the mics to the project yet-it's just been in the "idea" stage. I'll take some measurements soon, and see what gives.
First Project...
in Finished Products & Misc.
Posted
As for the pitting: get yourself a good Norton whetstone, one of thelarge ones about 8"/10" long. You want a very fine side. You won't use the coarse side. Set the action up in a vise where you can easily move it around. Get your bottle of honing oil and go to work. The secret is keep the stone moving, never use it like a file. The whole idea of using the stone, and not a polishing wheel is to keep the reciever true and square. It goes pretty quick. After ten or fifteen minutes of "honest" work, you'll be able to tell if the pits are truly minor. You'll have to be the judge of if they are too deep to take out with the stone. If they are, then you don't want a high polish on the metal, you'll want a bead blast finish. If they come out, the sky is the limit. Sandpaper on various sizes of wooden dowels work well for the concave surfaces. Again, a caution about polishing wheels. They are REALLY good at screwing up the "lines" of the action, making their own pits and lumps.