8uck5nort
-
Posts
389 -
Joined
-
Last visited
Content Type
Profiles
Forums
Events
Everything posted by 8uck5nort
-
Does anyone cut the Tung Oil with mineral spirits to dilute it for better penetration?
-
I usually spread peanut butter all over rifle and then let the neighbors dogs lick 'em clean Hehehehe.... Seriously all good suggestions. I've used Purple Power from Walley World. I've got the best results when using hot, hot water and soaking the parts with degraser and scrubbing, anything to get the heat up on it will help liquify the oil based stuff. Someone on this board also suggested wrapping in tissue paper/towels and then leaving it in the trunk of the car on a hot day. Unfortunately you will need to wait about 4 months or so around here to do that.
-
Scope Mounting Question And/or Debate
8uck5nort replied to 8uck5nort's topic in Sporterizing Firearms
The scope base and scope actually came from a site mount kit for a mauser. I used it briefly on my spanish mauser and it never really shot well. Howerver, I believe the barrel was toast. In fact I just pulled my first barrel off last night from that very same rifle. I am going to rebarrel in 7mm mauser it was in 8mm. I have been hacking and filing on it to try and get it to work/look right, but not sure if this is ultimately a dead end or should I keep looking for a reciever mount/scop that will work. I really will not know until I get to the range and see what happens. -
Ok. Here goes... I have been trying to come up with a base and scope combo to scope a carcano for plinking and maybe hunting yotes using the 6.5mm carcano cartridge. The action has a rear split ring and utilized a stripper clip. I really don't want to go with a side mount scope just yet. I toyed with a weaver style base and, utilizing the rear site base/pedestal on a Terni rifle, affixed the base to the site base instead of the action itself. I have a LER 2x7 scope affixed and may have something that will work. I have yet to take it to the range. However, upon doing more research (I am still very much a newbie to this stuff) scope mounting and selection seems to be an art as much a science. One thing concerns me about my current mounting idea and I honestly don't know if there is much to it. Upon firing the barrel it vibrates as the bullet travels down the length of the barrel in addtion to the other movement of the recoil. This would seem to me to cause an excessive amount of movement that could possibly cause alignement issues after several shots. Has anyone ever heard of scopes being mounted in/or on a barrel mounted site pedestal? Am I over thinking this one? I have read that exscessive vibration or even the wrong kind of vibration can ruin scopes. Example, putting a rifle scope on an air rifle will ruin it, etc... I am currently trying to build my own weaver style scope base that would mount to the front of the action, more like a mauser, but be cantilevered out over the barrel or affixed to a pedestal that is affixed/pinned to the barrel. I am not ruling out using a single shot setup and ditch the stripper clip or using a shotgun or fixed mag scope that has LER. I am just now diving into parallax, mag, light gathering, etc.. So I am still trying to get all the jargon straight. Any way what do you guys think? Any hard and fast rules when picking scopes and mounts for a rifle of a particular caliber/situation?
-
Clemson how did this work out for you?
-
Looking good!
-
I'm sure it will also let you play your mp3's and recieve a call, and the RF ID will let the Feds know exactly where the firearm is located at all times! I wonder what happens when someone writes a virus for all these interconnected devices. Now I've gone and depressed myself.
-
Unfortunately no. There is a couple of things I need to work on before doing work for others. This engraving was done on an unfinished stock and took several attempts to get it right so I had the luxury of rasping and sanding. I am getting better at placement, but not there yet. Another factor is I am going to have to find a better way to keep the smoke out of the house cause I had to leave the machine open to fit the stock. Wife not happy with a house full of smoke. So I got some challenges to overcome first.
-
Appreciate the offer for help. I may end up taking you up on that. I have done some network consulting work out your way last year in Princeton, Ill. I have decided to give blueing one more try. It is a barreled action that I will be working on. I have it pretty much sanded down to bare metal and will work this weekend on getting it polished up to 800 grit. This time I am going to heat the metal with in boiling water to get the temp up to 200+ and then apply the blue. We'll see what happens.
-
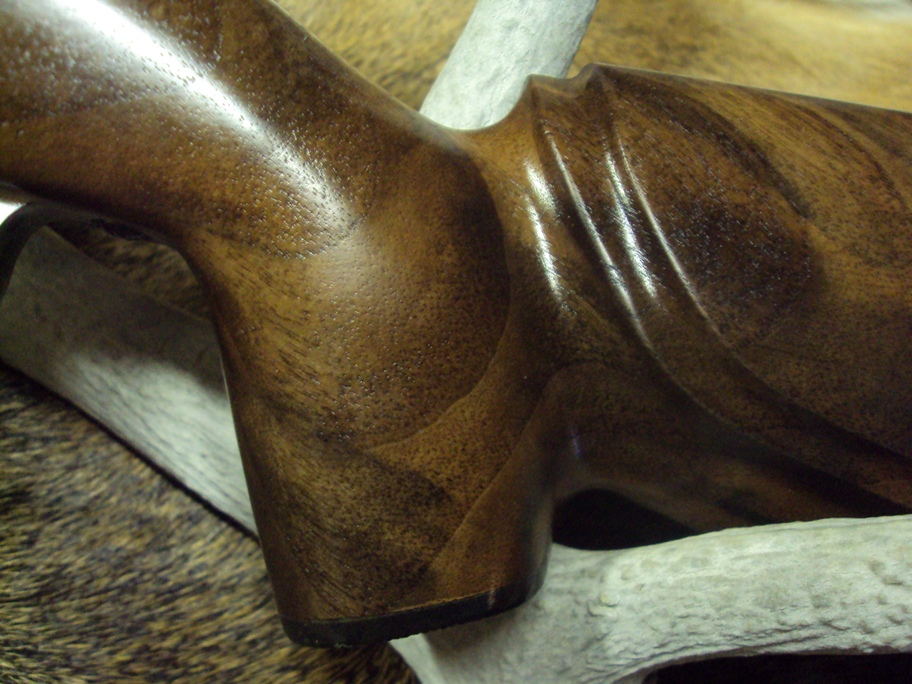
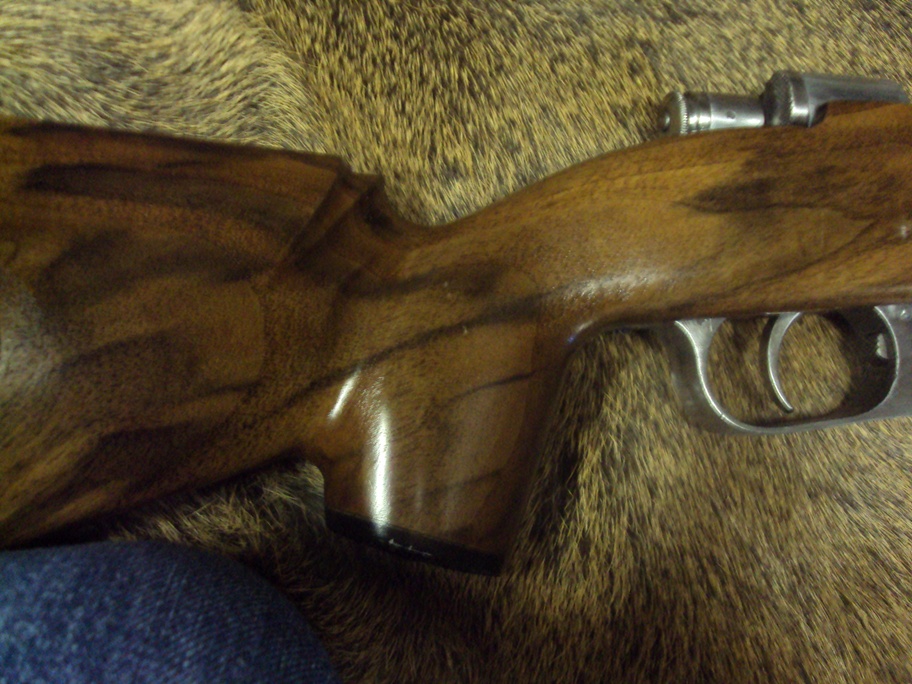
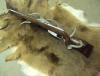
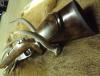
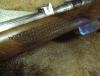
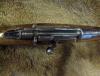
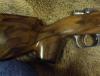
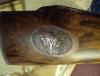
Stock work is pretty much done. Pics as promised. Remember no laughing until at least the third or fourth one. It looks better in the pics, but I am pleased. I have about 120 - 130 hours in the stock as I did it without powertools save a battery powered hand drill and rasp bit for some of the inletting work. All the engraving was done with my laser engraver. Chose the symbol of a Phoenix. From the ashes of the old rises a new rifle type thing... Yeah I know. Action is bedded - first time for that as well. Next step is the metal finishing.


-
Just got a reality check after atttending a FASFA workshop for my son who is attending college this fall. I will be beyond broke shortly... I was originally going to get a small compressor and accessories for sandblasting, and a SS tank and the chemicals for parkerizing, but I am not going to be able to acquire all that stuff and be able to get the current project done, well not for another 10 years or so at the rate the colleges will burn through my money. This looks like a lower cost alternative that will still produce a decent metal finish as long as I rough the surface and throughouly clean/degreas before applicaiton. Oh yeah I don't have an oven big enough to fit a barreled action in either, so it needs to be a no bake solution for now. Looks like I can get this done for under 30-40 bucks or so.
-
I am working in my basement and it is relatively cooler. Say upper 50's low 60's this time of year. That makes sense then. When the ambient temps warm will the milkiness, if present, go away?
-
I am putting on the final coats and have noticed somewhat of a cloudy or hazey appearance in some spots. Sanding between coats appears to be taking out the spots, but when the next coat dries I get them back. However, they are not in same place. Is this normal when using Tung oil or this particular brand? Is it just part of the process? Overall it is looking good, just not sure if this going to cloud up or am I just working through it. Could it be I am putting it on too thick? The product directions say apply additional light coat after 24 hours. Sor far I have three coats and used 600 grit wet/dry to sand between coats and used fresh paper to rub in additional coats. I am doing another coat tonight with 800 grit and then do a final coat and rub down with 0000 steel wool after it dries for a total of 5 coats, and then polish with a pledge furniture polish to give it a shine and depth.
-
That was awsome!!!!!!!
-
Interesting looking project. Looks like you got your work cut out for you.
-
Is Anyone Interested In Doing There Own Work Anymore?
8uck5nort replied to bubbamauser's topic in Sporterizing Firearms
Both RDM1962 and Brenden have echoed very similar reason why and how I got into this hobby and love doing it. The challenge, learning the skills, and pride of creating something unique. I know that I will not produce guild quality work for a long time, and maybe never, but it is goal I have set for myself and hope to be doing it for a long time and have lots of fun getting there. -
Ummmmm, what kinda home kit are you talking about?
-
LOL! Pun or no pun intended?
-
I found a 30 inch Stainless tank for around 100 bucks. I found a 24 inch tank with a SS basket with ss handle for 59 bucks (it's actually a fish poacher but will work). The extra six inches is probably a good thing, but cost is always a concern. Do you guys typically pull the barrels and do the barrel/action seperate which then makes the 24 inch adequate for anything I'll be doing, or do you try and do them attached to each other? Question I got is do you want to parkerize the inside of a barrel or chamber? Can you parkerize everything? To me it would seem you would not want to parkerize the inside of your barrel, but I don't really know. How about the action rails? bolt? firing pins, etc...
-
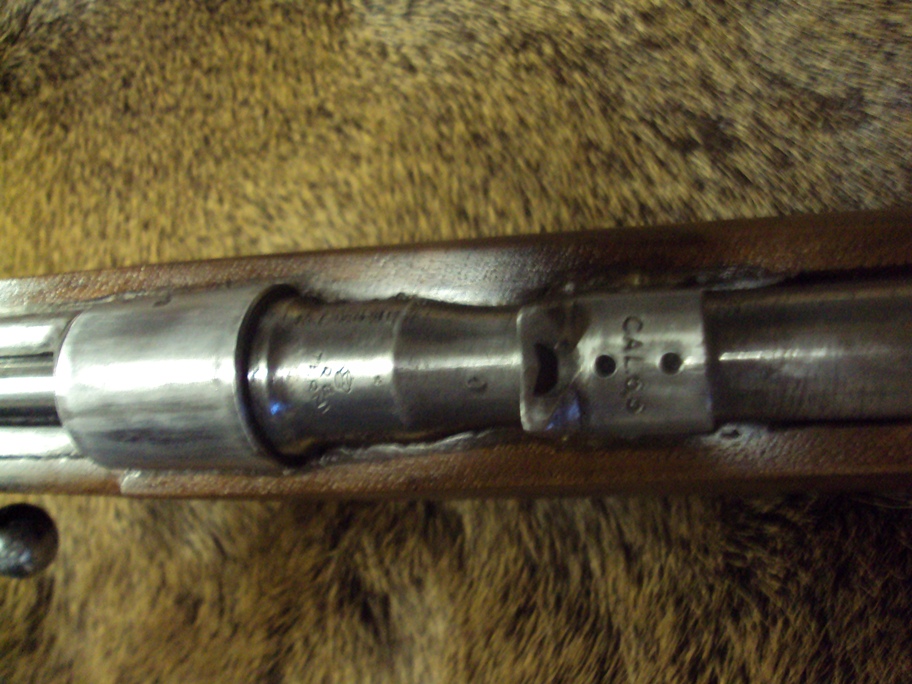
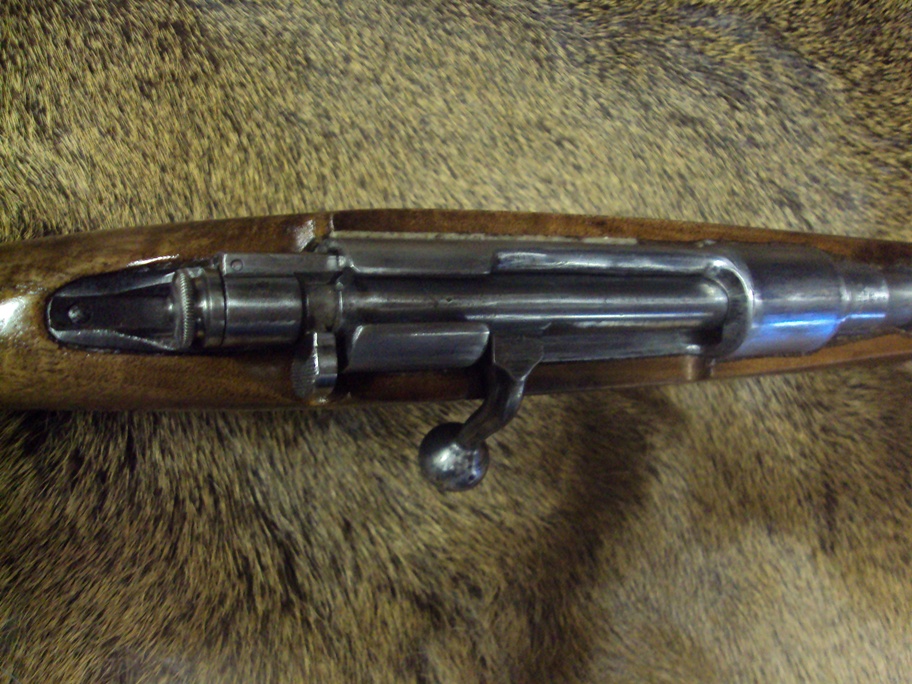
Well I am in the home stretch on the carcano stock. I should be able to put my first coat of Tung Oil this weekend. The inletting and bedding work (both pillar and action) is done and I a debating on wether or not to Laser Engrave the stock. I have been practicing on this stock as I have been workinging on it and have become decent at image placement. That is turning out to be the most difficult part. I will get pics up in a week or two of progress as I am pleased with my work. I know it is not perfect nor even professional quality, but for my first foray into hand shaping/carving from a semi-shaped blank I don't think I shamed myself too much. After I complete the stockwork I am going to turn my attention to metal refinising. I tried blueing a while back and got less than spectacular results. In fact I was down right dissapointed with it. I am sure it was my lack of experience, but I want this rifle to look good when I am done since I have so much time into it. I found these parkerizing kits (yes I know I am cheating a little). I was going to do it on the cheap using the instructions posted on this site, but figured getting the kit and doing it the first time or three this way may be a little easier. What do you guys think. It comes with instructions, SS tank, and the chemicals for a plain jane black finish for 90 bucks. I have a couple more projects in the queue and I am pretty sure I will be using this process exclusively for them. I would like to get blueing process down, but I would also like to get this done and parkerizing actually "looks" a little easier than blueing. http://www.calvan.com/html/parkerizing_tank_kits.html
-
Small Diameter Barrel Blank Needs Action Suggestion
8uck5nort replied to 8uck5nort's topic in Sporterizing Firearms
Thanks Gun Nutty, Cool. I got some direction and sounds like some help when I get ready to tackle this one. I am slowly acquiring equipment a little at a time. Just picked up a table saw for christmas. Next up is a drill press, and then a belt sander, then maybe a lathe, or then a... Whew! I just spent another grand! Doh -
Small Diameter Barrel Blank Needs Action Suggestion
8uck5nort replied to 8uck5nort's topic in Sporterizing Firearms
No issues, especially with the .357. Anyone who can operate a lathe can make it. You'll just need some accurate measuring tools. Using the Carcano barrel as a sleeve would be interesting. I'm not sure how to grab it in a lathe, as there wouldn't be much to grab onto. All you're doing is creating a stepped-sleeve that, when placed over the chambered end of the barrel, will allow you to cut the combined pair as though it were a Carcano barrel. The barrel will need to be cleaned up at the chamber end to eliminate the taper; I'd want a uniform diameter surface for the length of the inside of the sleeve. The sleeve will be 1.25" steel (I'd just grab some scrap low carbon), about 4" long. You may want it shorter; I'd want a graceful transition rather than an abrupt one. Maybe 3 - 3.5 inches will look better on the thinner barrel. Dunno. Your call, not mine. Prior to cutting the shank threads, it will be uniform diameter from the rear to a step at 2.25". At that step, it will taper to a diameter of APPROXIMATELY 0.795" at the 4" end (it will be a smaller diameter than that - I'll follow up). That taper may need to be cut last; you'll need a shoulder to press the sleeve onto the barrel with an arbor press. What inside sleeve diameter are we looking at? Whatever the diameter is at 4" from the rear end of your barrel; you'll have to machine the barrel back to the breech end that same diameter so it's uniform. It might be 0.770". It will be less than 0.795". I'd want both diameters to be equal for a press fit. I'm thinking in terms of shaft bearings... 4" is a long length to press though. I would NOT want a "running" fit. I'd use two small diameter pins set-in like sights are set on military barrels. You can machine the barrel with the sleeve on it as though it were on piece after that. I've done this with sleeves on shafts and bearing on shafts. It should work on a barrel too. I'll admit I had t re-read this a couple of times to follow it, but it sounds like you got this pretty much worked through. I like the idea of the pins and being able to machine the barrel as a single piece. I have actually sent out pump motors to have bearing/bushings press fitted and they last for years spinnig/vibrating at very high speeds. Should not have a problem with separation if done like you said from the concussion of firing. The interesting thing is I would actually like to the get the sleeve as long as reasonbly and safely possible for one reason. Scope mount. I could acutally use the extra meat beyond the chamber to safely tap into and mount the base/rings for the LER scope. This would actually be engineering it for LER in mind and get neatly around the rear split bridge/bolt handle problem. If I can get Sonics mag idea to work I will have a alot of length to play with in the front of the action for the scope. I actually have a Boyds stock for this one that is need of some minor reapir and it would look really unique if it can come together. -
Small Diameter Barrel Blank Needs Action Suggestion
8uck5nort replied to 8uck5nort's topic in Sporterizing Firearms
Thanks Sonic. I'll see if I can snag one. That would be really cool to have a Hig cap .357 mag bolt action. If it will cycle all of them. -
Small Diameter Barrel Blank Needs Action Suggestion
8uck5nort replied to 8uck5nort's topic in Sporterizing Firearms
It is not the one from the Timberwolf. I saw that one, but it has dove tail cuts at both end of barrel. What kind of issues would I expect to see with the bushing approach? Setting headspace? Is this something any fairly competent machinest could do? I have the carcano action already and will have a barrel to copy or heck even use it as a donor for the bushing, it would already be threaded!!! -
Small Diameter Barrel Blank Needs Action Suggestion
8uck5nort replied to 8uck5nort's topic in Sporterizing Firearms
Ken98k, This is the exact barrel I have. http://www.e-gunparts.com/DisplayAd.asp?chrProductSKU=957250&chrSuperSKU=&MC=&CatID=6886&mySort=1